I’ve received several questions on this in the last couple of weeks, so I thought I’d address how to add an image and link to your Word Press blog post here so it’d be available to everyone in the On Writing Library.
INSTRUCTIONS TO ADD AN IMAGE & LINK TO YOUR WP BLOG POST
1. Place the image you want to upload and the link you want to attach to it in a note on your desktop so you have easy access to both.
2. Log in to your Word Press blog, as usual and go to your Dashboard. Click Posts and Add New, just as you always do to create a new blog post. Create your post by adding your text.
3. You can place the image wherever you choose within the post. (Just position your cursor at the desired insertion point on the post.) For the sake of this example, we’ll center this one at the end of the post.
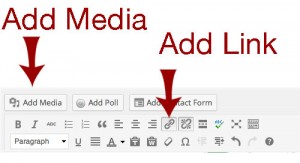
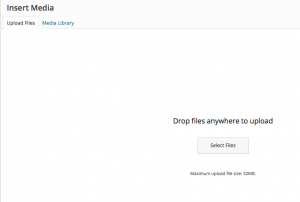
4. Click “Add Media.” It’s in the header of your blog post. Top, far left. (See graphic above.) When you do this, a window will pop up that looks like this:

5. Click “Upload Files.”
6. Now you’ll see a window come up that looks like this:
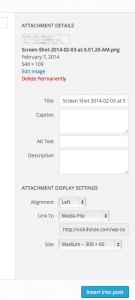
7. Drag your image from the desktop onto the screen and drop it. On the Right of your screen you can customize details (they can be changed later, also) or not. At the bottom right, you’ll see a blue button that says: “Insert into Post.” Click it.
Your image will then appear in the post. If it’s not positioned where you want it, you can click to select it, then click the typical Left, Center or Right on the post header to move the image. (See the one with Add Media, Add Link in red. Left, Center, Right is to the immediate left of Add Link.)
Now your image is in place in your post. There are two ways to add your link. We’ll do the most simple one…
8. Click on the image to select it. Then go to the blog header and Click “Add Link.” A window comes up that looks like this:
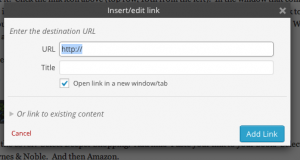
Go to the link on your desktop note. Select or highlight it and copy or drag it to the top space (blue with http:// in it on the sample) beside “URL” and paste or drop in the link URL. You’ll probably want to click the checkbox to open the image in a new page. Then Click the blue button that reads: “Add Link.”
And you’re done! Your image is in your blog post and when someone clicks on it, it will take them to the location of the link you inserted.
————————–
This article assumes you’ve uploaded an image the size you want it to appear in your post. If it’s too big, then mouse over the image. You’ll see a mini picture on the left and a no sign beside it. Click the mini picture. You’ll get a screen that looks like this:
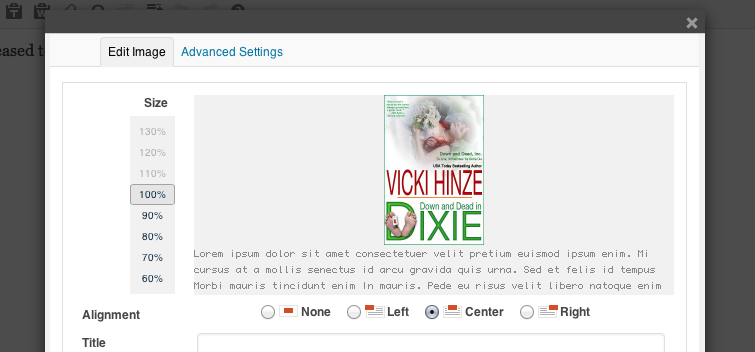
There’s more under it, but what you need is on the left. Choose a percentage to adjust the size, click update (bottom left), and your image is resized.
Hope this helps!
Blessings,
Vicki
PS. I am a guest today at Debra Webb’s Weekly Briefing. Talking about Down and Dead in Dixie and Clean Read Books. Commenters are eligible to win one of five copies of Dixie, so come over and converse!